Step 1: Create a Document Template
Step 4: Add a New ONECase Template
Create a document as you would any MS Word letter or form.
Tip: A ‘Table’ gives you better control over formatting merged data than free-form.
Save the file as a ‘Document Template’ rather than a ‘Word Document’.
Import the ocMain and ocFiles modules.
With the Word template pulled up,
Press Alt+F11 to open the Visual Basic environment.
Import ocMain and ocFiles.
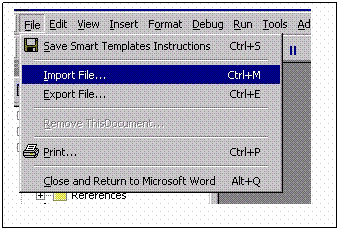
Select ‘File’ from the menu bar.
Select ‘Import File’ from the drop-down menu
The Import File dialog will open
Find the folder in which you stored ocMain.bas and ocFiles.bas.
Select ocMain.bas and press Open.
VBasic will add ocMain.bas to a folder called Modules.
Repeat the process to add ocFiles.bas to the Modules folder
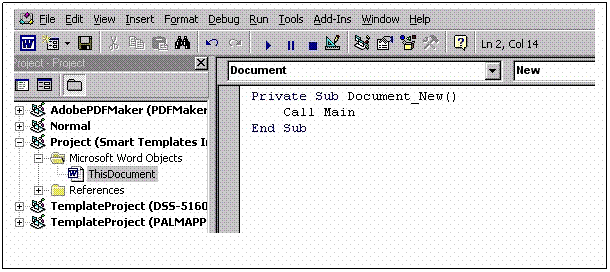
Remaining in the Visual Basic environment,
Find the Project you are working on,
Then find the folder called Microsoft Word Objects,
Then open the folder and find ‘This Document,
Then double-click on the document,
A box will open.
Select the drop-down menu arrow.
Select from the drop-down menu ‘Document’.
Select the drop-down menu arrow to the right.
Select ‘New’ from the drop-down menu.
The screen should look similar to the picture below.
Type ‘Call Main’ in the space between Private Sub… and End Sub
Save the Template file.
Use either Save As in the File menu option or the diskette icon.
Close the Visual Basic Environment.
Be sure to save the Template file.
If you are unfamiliar with the Visual Basic environment, these can be tricky steps.
Call us if you need help
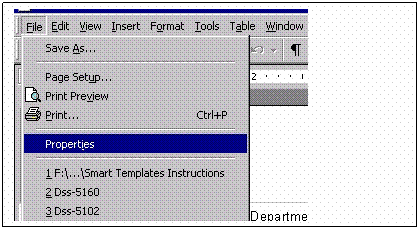
You may want to update the Title and Author of the Smart Template.
With the Word template displayed, select File, then Properties.
File à Properties
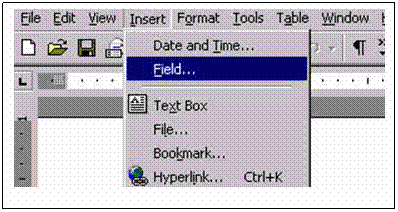
Use the Insert à Fields function to provide a prompt to key data for the worker.
Use the Insert à Date and Time function to insert a date at a specific location.
For more on these functions, consult a MS Word manual.
The new ONECase form template tells ONECase those fields to pull from the database for merger into the Smart template. Use the ONECase procedure “Work with Form Templates” on Menu 18.
Create a ONECase Template. For reasons that we will explain in Step 6, we recommend that the new ONECase template be named whatever the final template will be named -- plus the suffix ‘-N’. For example, if you are working with a Smart Template that will be called ‘DSS-5104’ when you put it into production, you should name the ONECase template ‘DSS-5104-N’ -- at least until you complete the Final Testing step and are ready to put the Smart template into production.
Tip: Use F2=Copy to copy from “starter” templates (eg, ADP-Short, ADP, NHC-LH)
Note: Special Address fields automatically merge discrete fields and roll-up lines if Address 2 not present.
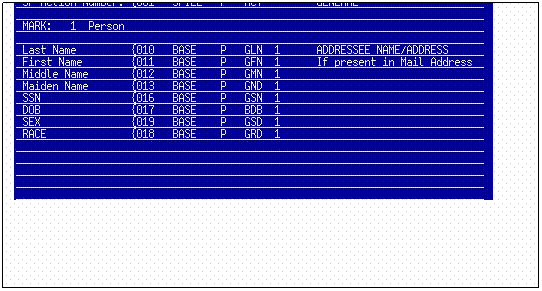
GFL Full Name
PL0 Care of Line,
PL1 Address Line 1,
PL2 Address Line 2,
PL3 Address Line 3 City/State/Zip
GSA Salutation
Insert bookmarks at the locations in the Smart Template where you want to merge ONECase data.
There is no limit to the number of fields that you can merge. The minimum is the ‘SF Action Number’ which you should merge into the Smart Template.
Press F16=FldDsc on screen CS3450-2 of the “Work with Form Templates” program to show the sequence in which the fields will appear in the delimited file passed from ONECase to the CLTDATA merge file in c:\qtemp.
In the example shown below, ‘Last Name’ will be the second merge data field -- bookmark ‘BK2’. Social Security Number will be the sixth field -- or bookmark ‘BK6’.
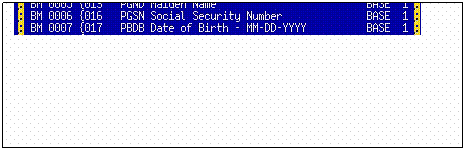
The field marked ‘BM 0001’ is bookmark Number 1. ONECase will pull that field from the database and will position its value in the first bookmark field in the file transferred. You should name this bookmark ‘BK1’. The Visual Basic program will put ‘Last Name’ at the bookmark you name ‘BK2’. And so on.
Note that bookmarks appear as a figure that looks like a cross-section of a I-beam ’I’.


Once you successfully test the Visual Basic programs and the bookmarks, you are ready to test the Smart Template in a production environment.
You are now ready to test the Smart Template with ONECase.
Copy the Smart Template to the SMARTS folder on a AS400 server. There a number of ways to do this. You can use the Operations Navigator program. You can map a network drive to the SMARTS folder. Or, you can use Network Neighborhood. If you need assistance, talk to your IT support person or call us.
Add a record to the “Work with Smart Templates” file (menu 35, option 7). You have already added a ONECase template in step 4. ONECase requires that both these control records be in place to test or to put a template into production.
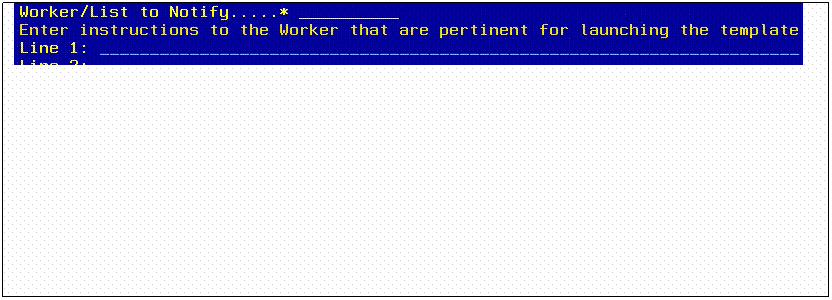
Make sure that the Template File Name ends with ‘.DOT’. Type a ‘Y’ in the Save Merged File field if you want to save the merged document on the file server. Type instructions for your workers in the lines on the second half of the screen. You might check some samples that Cox has prepared to show how to use the space.
Hopefully, the name of the ONECase template has an ‘-N’ suffix on it. Here’s why. Adding a record to the Smart Template control file signals ONECase to stop using the old ONECase template and start using the Smart template. The ‘N’ means ‘new’. The suffix could be ‘-T’ or any systematic method to show that the template is being tested and is not is live production.
Create document from the Smart template. You are now ready to test the Smart template. Access any ONECase program that supports Smart templates. This list includes:
“Work with CPS Incidents”
“Work with Cases”
“Work with Day Care Cases”
“Work with Client Statements”
“Work with Placements” (placement screen)
“Work with ADS Incidents”
Type a ‘T’ in the option field near the left screen boundary. Press Enter. A window will appear into which you will type the Smart template ID. Then press Enter again. The ‘Lookup Person List’ screen will appear.
The ‘Lookup Person List’ screen is important. Pay attention to what the instructions say. After you do what the instructions say, press Enter.
ONECase now goes into action. First, it pulls data from its database, puts that data into a delimited file, then copies that file to the c:\qtemp folder on your c: drive. Then, ONECase launches the Smart template from the SMARTS folder. Next, MS Word runs the Visual Basic program, which merges the variable data into the document at the bookmarks you set up earlier. If you have used the Insert Field features, Word will prompt you to type data into those fields before it merges the data. Finally, you can finish typing whatever remains.
When the document is ready, save it by pressing the diskette icon in one of the taskbars. You can print the document without saving it. Or save the document without printing it.
When you return to ONECase, you will need to tell ONECase whether everything went well. If you press F13=Save, ONECase saves the document in a permanent location and marks the status of the Action Record accordingly. If you press F3=Exit, ONECase deletes the file and marks the Action Record with a incomplete status.
Once you have tested the Smart Template successfully and are ready to put it into production, simply create ONECase and Smart Template control records without the ‘-N’ suffix used for testing purposes.
Use option 14 on menu 18 to create the ONECase template. The cleanest approach is to delete the existing template, copy the ‘-N’ record to make a record without the suffix, then delete the ‘-N’ record.
Use option 7 on menu 35 to add the Smart template control record.